In today’s digital world, keeping your data safe is more important than ever. Microsoft Excel is a popular tool for managing information, and it often contains sensitive details. To ensure that only authorized individuals can access or modify your Excel files, it’s essential to use password protection. This article will guide you through the steps to secure your Excel sheets using simple, everyday language.
Why Protect Your Excel Files?
Excel spreadsheets can hold a wide range of information, from personal budgets to business financial records. Without proper protection, anyone who gets hold of your file can view or change its contents. By adding a password, you control who can open or edit the file, keeping your data safe from unauthorized access and protecting Excel Sheets.
Setting a Password to Open an Excel File
To prevent others from opening your Excel file without permission, you can set a password that must be entered before the file can be accessed. Here’s how you can do it:
- Open the Excel File: Start by opening the Excel file you want to protect.
- Access the File Menu: Click on the “File” tab located at the top-left corner of the screen.
- Go to Info: In the menu that appears, select “Info.”
- Protect the Workbook: Click on the “Protect Workbook” button. A dropdown menu will appear.
- Encrypt with Password: From the dropdown, choose “Encrypt with Password.”
- Set Your Password: A dialog box will pop up asking you to enter a password. Type in a strong password that you can remember. Click “OK.”
- Confirm Your Password: You’ll be prompted to re-enter the password to confirm it. Type it in again and click “OK.”
- Save the File: Finally, save the file to ensure the password protection is applied.
Image For Easy Understanding:
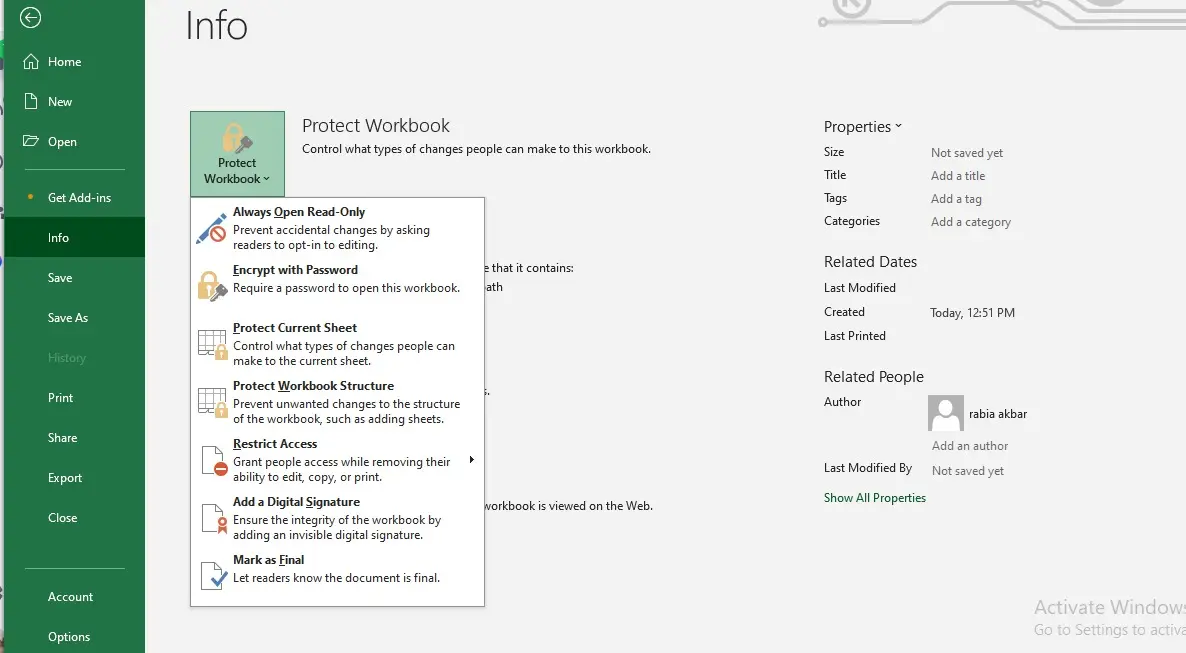 Now, anyone trying to open this Excel file will need to enter the password you set.
Setting a Password to Modify an Excel File
If you want others to view the file but prevent them from making changes, you can set a password that restricts editing and Protect an Excel Sheet. Here’s how:
- Open the Excel File: Open the file you wish to protect.
- Access the Save As Option: Click on the “File” tab and choose “Save As.”
- Choose a Location: Select the location where you want to save the protected file.
- Open Tools Menu: In the “Save As” dialog box, look for the “Tools” button near the “Save” button. Click on it.
- General Options: From the dropdown menu, select “General Options.”
- Set Password to Modify: In the dialog box that appears, you’ll see two fields: “Password to open” and “Password to modify.” Enter your desired password in the “Password to modify” field.
- Confirm Password: Click “OK,” and you’ll be prompted to re-enter the password. Do so and click “OK” again.
- Save the File: Save the file with the new settings.
Image For Easy Understanding:
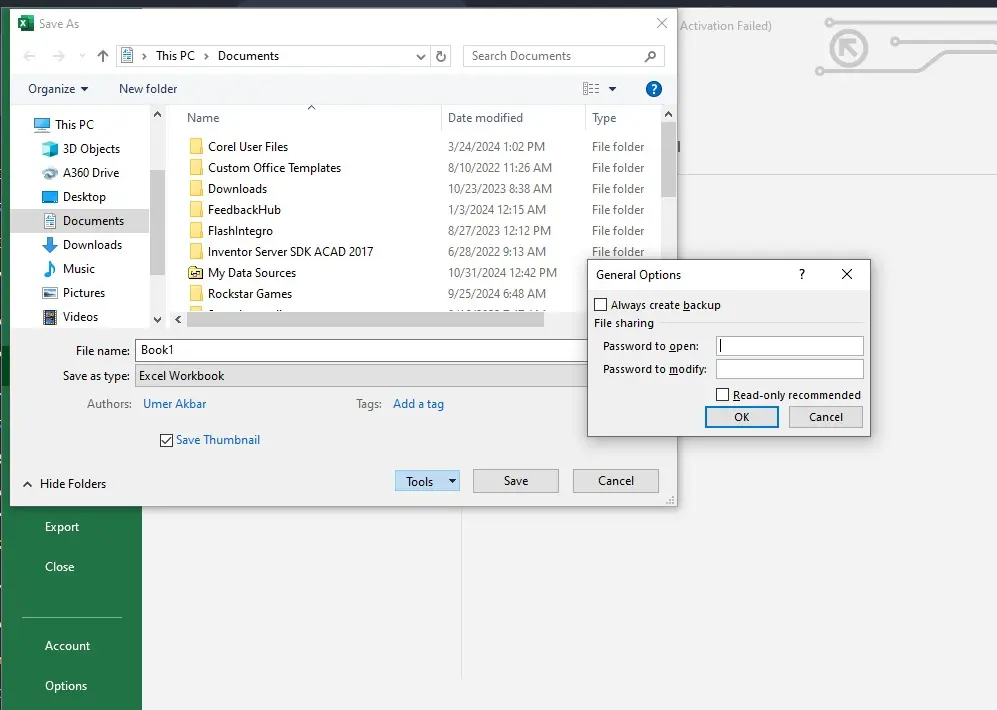
With this protection, users can open and view the file without a password but will need the password to make any changes.
Protecting Specific Worksheets Within a Workbook
Sometimes, you might want to protect only certain sheets within a workbook, allowing users to view and edit other parts. Here’s how you can protect individual worksheets and Protect an Excel Sheet:
- Select the Worksheet: Click on the sheet tab of the worksheet you want to protect.
- Go to the Review Tab: Click on the “Review” tab at the top of the screen.
- Protect Sheet: In the “Review” tab, click on “Protect Sheet.”
- Set Protection Options: A dialog box will appear, allowing you to set a password and choose what actions are permitted (such as selecting cells, formatting cells, etc.). Enter a password and select your desired options.
- Confirm Password: Click “OK,” then re-enter the password when prompted and click “OK” again.
Image For Easy Understanding:
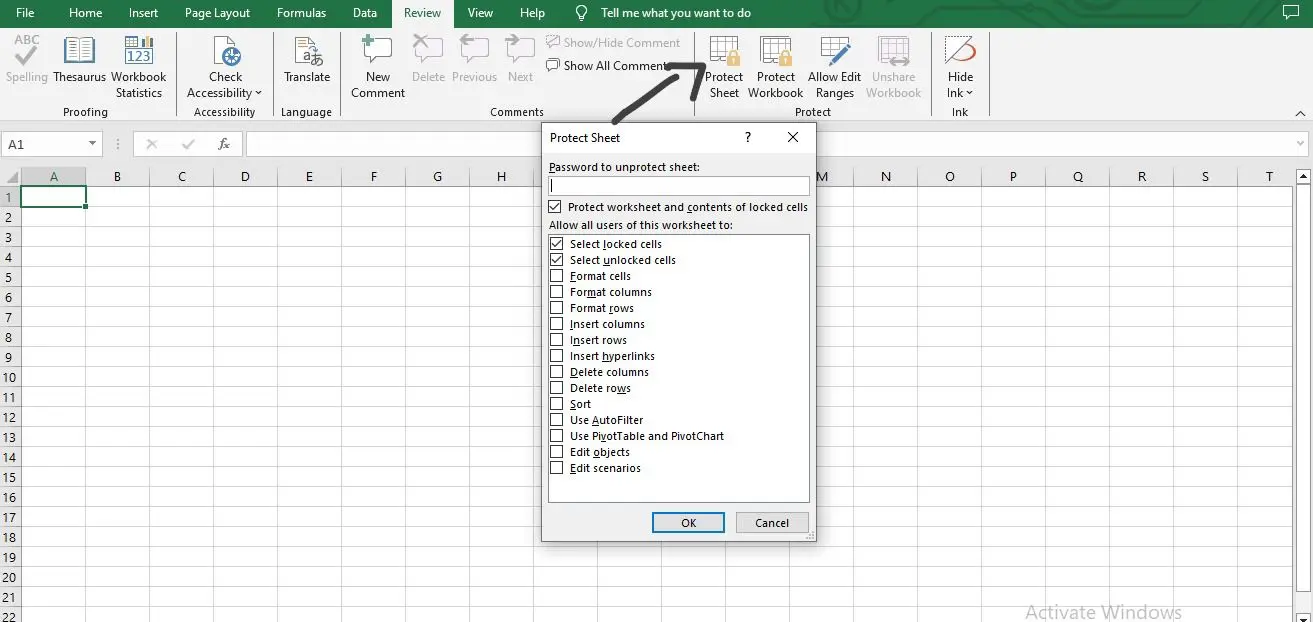 Now, the specific worksheet is protected according to the options you selected.
Removing Password Protection
If you no longer need password protection on a file or worksheet, you can remove it by following these steps:
For a Workbook:
- Open the Protected File: Open the Excel file that has password protection.
- Access the File Menu: Click on the “File” tab and select “Info.”
- Remove Protection: Click on “Protect Workbook” and choose “Encrypt with Password.”
- Delete the Password: In the dialog box, delete the existing password so the field is empty.
- Save the File: Click “OK” and save the file. The password protection is now removed.
For a Worksheet:
- Select the Protected Worksheet: Click on the sheet tab of the worksheet that’s protected.
- Go to the Review Tab: Click on the “Review” tab.
- Unprotect Sheet: Click on “Unprotect Sheet.”
- Enter Password: If prompted, enter the password that was set for the sheet.
The worksheet is now unprotected and can be edited freely.
Tips for Managing Passwords
- Choose Strong Passwords: Use a combination of letters, numbers, and special characters to create a strong password.
- Remember Your Password: Write down your password and store it in a safe place. If you forget it, you may not be able to access your file.
- Use Password Managers: Consider using a reputable password manager to keep track of your passwords securely.
- Regularly Update Passwords: Change your passwords periodically to enhance security.
Conclusion
Protecting your Excel files with passwords is a straightforward way to ensure that your sensitive data remains secure. Whether you’re safeguarding personal information or critical business data, following the steps outlined above will help you control who can access and modify your Excel files. Always remember to keep your passwords safe and choose strong combinations to maximize your data’s security.
Excel Related Topics: